
 Slide
Production
Why use
Mounts?
- Mounts keep the visuals in focus, preventing them from
warping due to the heat of the projector lamp.
- They also keep slides from bowing, ensuring that they will
drop smoothly into the projector without getting stuck.
- Finally, they facilitate the use of gels, double-stacked slide
films, masks, and other special production techniques.
All slides should be placed in mounts before they are projected.
(We use mounts manufactured by Wess Plastics. Browse through the Wess
catalog sometime in the Production Room--it will get your creative
juices flowing!)
Begin by placing cardboard-mounted slides on the illuminated
sorting rack so that all slides are arranged in order and look
exactly the way they should appear when projected, right side up and
reading correctly left to right. As slides are inserted into mounts
one at a time, return them to their original positions on the sorting
rack.
 There
are eight ways to drop a slide into a carousel tray, and seven of
them are wrong.
To ensure that a slide image will be projected correctly it must
be properly inserted in the mount in the first place. All supplies
are kept in the designated drawers in the Production Room. The
following guidelines assume standard front projection--i.e., no
mirrors. (For Panorama projectors with mirrors, slide film should be
mounted backwards as compared to what is described below.)
How to Mount a
Slide
- Select the desired rectangular (002), square (268), or
circular (302) Wess mount. The latter two work best for telescopic
views, but the non-negotiable principle is to avoid grey
rectangles as much as possible.
- Select any desired masks or gels to be used in the mount with
the slide film.
- Use a gel to add color or ease eye-strain associated with
black and white images.
- Soft-edge masks are used to smooth out the junctures of pan
images.
- Hard-edge masks add variety to dissolve sequences,
etc.
- Browse the sample masks kept in notebooks in the Production
Room, or pictured in the Wess catalog, to get ideas for slide
effects your production might use!
- Place the mount on the assembly table before you so that the
mold number (002, 268, or 302) is visible...
- on the top right, if the image is horizontal. The
serrated edge will run along the top
center.
- on the top left, if the image is vertical. The
circular notch will be visible just above the
mold number, and the serrated edge will run along the left
side.
- This is the way the mount will be dropped into the carousel
tray after the visuals are inserted.
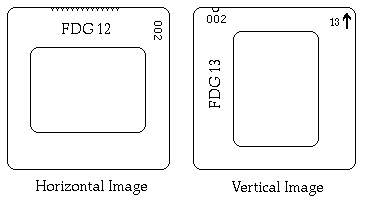
- Label the mount:
- Mount labels are dispensed from round yellow plastic
containers.
- A fine point Sharpie marker may be used if the mounting is
expected to be permanent. If you use a Sharpie, however, double
check the size and alignment of the mount to make sure it will
work, and be sure to blow the ink dry before handling.
- Label mounts near the Wess mold number. This means labeling
them on the top-side (if the image will be horizontal) or along
the outside margin (if the image is vertical). That is, write
the label of a horizontal image so that it will be right-side
up with the mount oriented as it will be dropped into the
carousel tray.
- Labels should include the show and number of the slide film
to be placed inside it, e.g. FDG 12 (slide #12
for the Follow the Drinking Gourd program).
- For a vertical image, write the show abbreviation in the
label area (beneath the mold number on the outside margin), and
write the slide number on the upper inside corner. Also for a
vertical image, draw a small upward-pointing arrow in the upper
right corner.
- The extruded Wess mold number in the label area may cause a
label to peel off a little, which might prevent it from
dropping into the projector. Avoid this protruded number, or
secure the label with transparent scotch tape.
- Label the lower right corner of the mount with the number
of the slide for future reference, unless this is part of the
main label as noted above (for a vertical image, write it so
that it may be read when the image is upside down). Be sure
to do this before destroying the original cardboard
mount!
- Labels will lie on the screen side of the
slide film when the slide is dropped into the projector.
- To open the Wess mount learn to do the Wess
Wiggle! The serrated edge is composed of two overlapping
parts that lock together. Hold the mount in your left hand with
the serrated edge on top, and use the thumb of your right hand to
push the closest overlapping part toward you so that the farther
part pops free. Experiment with a mount and you'll get the hang of
it quickly.
- Once the mount is open, blow any dust off of the two glass
sides with the lens blower-brush. If necessary, wipe off
fingerprints or smudges with a clean cloth. Keeping slides clean
is a perennial task of the planetarian; don't hurry or skip this
step.
- Extract the slide image from its cardboard mount:
- Place each cardboard slide in the Paper Mount Opener
(fastened to the slide assembly table).
- Make sure the slide lies in the proper orientation as
indicated on the Opener. The razor blade should cut one of the
narrow margins of the cardboard mount.
- Push the slide past the razor blade to separate the
cardboard layers. Push it all the way through: there is a wedge
positioned after the razor blade to ensure complete
separation.
- Occasionally the layers of the cardboard mount will not
cleanly separate after one pass. In that case, set the slide
down in the Paper Mount Opener again and run it through so that
the opposite margin is cut.
- Wear a white cotton glove on one hand to hold the film as
you carefully extract the slide by peeling away the cardboard
layers. Use tweezers if necessary. If you use a latex glove
instead and the glove is coated with powder, be sure to wash
off the powder before handling slides.
- Carefully clean the slide film with the blower-brush.
Cardboard powder is produced by the removal of the cardboard
mount, and should be removed before transfering the film to the
Wess mount.
- Insert the slide film into the Wess mount:
- Open the mount by a 90 degree angle.
- For a horizontal image, position the open
mount so that it lies on the assembly table with the label side
horizontal and face-down. The serrated edge of the vertical
side of the mount will lie at the top farthest away from you,
and the film-mounting pegs will be closest to you on the
horizontal side of the mount.
- For a vertical image, position the open
mount so that it lies on the assembly table with the label side
horizontal and face-down. The serrated vertical mount edge will
be on your RIGHT, and the film-mounting pegs of the horizontal
side will be on your LEFT.
- The horizontal or labeled side of the mount is the emulsion
side, and will face the screen.
- With the mount oriented as just described, insert
the slide film as you want it to appear when projected, i.e.,
so that the film appears right-side up and reads legibly
left-to-right. In other words:
- Horizontal image: The bottom of the film fits over
the mounting pegs.
- Vertical image: The left side of the film fits over
the mounting pegs.
- Wear a white cotton glove on one hand to press film down
around the pegs without smudging it with your
fingerprints.
- Add opaquing fluid or metal cropping tape to the slide film if
needed.
- With tape, the shiny side will reflect light back toward
the lamp instead of toward the screen.
- Take care not to cover the mounting pegs with tape, or the
mount may not close properly, especially if gels are to be
added.
- Add any desired gels, then add any desired masks. This will
put them on the lamp-side of the slide film (where they need to
be). If necessary, use a label as tape to secure them in the
mount.
- Close the mount by snapping it shut. Make sure it is locked on
both of the serrated ends.
- With the mount closed and the label right-side up and facing
you, the image will appear upside-down and backwards.
- Return the mounted slide to its position on the sorting rack.
Lay out the sorting rack so that it mimics the layout of the
storyboard tables:
- Arrange slides so that each row on the sorting rack
corresponds to a given projector (e.g., ICA).
- Arrange each row of slides left to right in order from 1 to
80 as they will be placed into carousel trays.
Placing Mounted Slides in
Carousel Trays
- Obtain a carousel tray slide-inventory sheet for each tray you
will use. These sheets, whether blank (for new trays) or
partially-filled, are kept on a designated clipboard in the
Production Room. When each slide is placed into a carousel tray,
copy its label to the inventory sheet.
- Place the mounted slide on the assembly table before you so
that the mold number (002, 268, or 302) is visible:
- on the top right, if the image is horizontal. The serrated
edge will run along the top center.
- on the top left, if the image is vertical. The circular
notch will be visible just above the mold number, and the
serrated edge will run along the left side.
- The label should read right-side-up.
- Drop the mounted slide into the carousel tray in this
orientation so that the visible, labeled side faces the screen.
- Survey the top edges of all slides in the carousel tray to
make sure that the serrated edges of all horizontal slides, and
the circular notches of all vertical slides, are oriented
consistently. Notches should be on the outside edge of the tray.
- For each carousel slot, enter the Show Abbreviation and Slide
Number. Example: Slide 54 of Cowboy Astronomer would be CA
54.
- Arrange pan sets first, then other slides in order. Keep pan
sets in corresponding slots (e.g., Left 1, Center 1, Right 1) to
facilitate "Find Slide" commands in Hercules automation files
(Find Slide 1 can be sent to the projector group instead of to
each individual projector separately).
- Slides for multiple shows may fit in the same carousel trays.
If so, leave no empty slots between externally-produced shows.
Every show automation file will begin with appropriate Find Slide
commands for all projectors. Leave extra slots after in-house
shows, if possible, to allow for show revisions and additions.
- If left and right pan slides were not mounted backwards, you
will have to drop them into the trays backwards to allow for the
mirrors on the lateral pan projectors. Load center pans the
ordinary way, since PCA and PCB do not use mirrors.
- With the screening projector in the Production Room, check to
make sure slides project as they should before taking the carousel
trays to the Planetarium. Except for externally-produced lateral
pans, if a slide does not project properly but the mount is
inserted with the correct orientation, do not merely flip the
mount in the tray: remount the slide film according to the
directions given above.
- Return all tray inventory sheets to the clipboard in the
Production Room.
- Now you are ready to automate the show in the
planetarium!
| Top |
©1997