
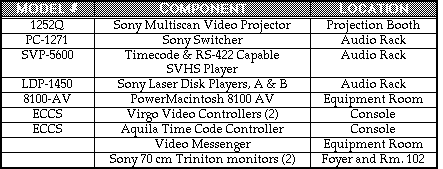
Many partial-dome special effects are most economically projected in a small dome by means of a three-tube RGB video projector (RGB = projecting superimposed red, green and blue images). Our video projector is installed in the Projection Booth projecting due east over the top of the star projector. The video projector is connected via the control devices to a high-end super videocassette player and two laserdisk players located in the audio rack, as well as to the PowerMac 8100 AV in the equipment room.
Turn on the video projector (VP) with the green button on the Switcher, or with the remote control.
|
LN |
Lamp On |
VP |
Video Projector |
|
LF |
Lamp Off |
VP |
Video Projector |
The Switcher receives video signals from the SVHS deck, from both Laserdisk players, from the PowerMac 8100 AV, and in the future from other sources (the unassigned ports may be used in the future for other builidings, cable TV, satellite feed, distance learning, etc.). It then sends these video signals to the Video Projector in the Planetarium Projection Booth.
|
Command |
Name |
Description |
|
LF |
LAMP OFF |
Turns Video Projector Off (very abrupt; abruptly turns off audio also) |
|
LN |
LAMP ON |
Turns Video Projector On |
|
#N (0 ² # ² 8) |
FADE VIDEO ON |
Fade video signal on in # seconds |
|
#F (0 ² # ² 8) |
FADE VIDEO OFF |
Fade video signal off in # seconds (does not work with SVHS) |
|
AFN# (0 ² # ² 8) |
AUDIO FADE ON |
Fade audio signal on in # seconds (does not work with SVHS) |
|
AFF# (0 ² # ² 8) |
AUDIO FADE OFF |
Fade audio signal off in # seconds (does not work with SVHS) |
|
SPLS |
SWITCHER PULSE |
Sets the Switcher Channel; use in conjunction with the SW# command (see below) |
|
SW# (0 ² # ² 8) |
SWITCHER NUMBER |
Selects the Channel Number for the desired video signal |
- Unassigned
- Unassigned
- Unassigned
- Macintosh
- Unassiged
- SVHS
- LDA
- LDB
To play a video signal, make sure the Video Projector has been turned on and has warmed up. Then set the Switcher Channel to the desired video signal (e.g., from the SVHS deck) using the SPLS and the SW# commands together as shown below:
|
SPLS |
Switcher Pulse Switch |
SW6 |
SVHS Deck |
|
PLAY |
Play |
SVHS |
|
|
FF2213 |
Find Frame 2213 |
LDB |
Laserdisk B |
|
SPLS |
Switcher Pulse Switch |
SW8 |
Switcher Channel 8 |
|
PLAY |
Play |
LDB |
Laserdisk B |
The following commands may be sent to either laserdisk player, above (LDA) or below (LDB).
FF2213 Find Frame 2213 LDB Laserdisk B
SPLS Switcher Pulse Switch SW8 Switcher Channel 8
(wait...)
PLAY Play LDB Laserdisk B
If both Sky-Skan disks are used for planetarium projection, it is customary to put #4 in LDB and #7 in LDA (note that SW7 is the switcher channel for LDA). This way multiple shows can be run the same day without having to flip the disks.
SPLS Switcher Pulse Switch SW7 Switcher Channel 7
FF2213 Find Frame 2213 LDA Laserdisk A
LS Loop Start
LS Loop Start
PLAY Play LDA Laserdisk A
W20 Wait 20 secs
RP999 Repeat Loop 999 times
RP999 Repeat Loop 999 times
- It may be necessary to turn on the foyer light circuit with a special light-switch key.
- It also may be necessary to press the "Display" button on the TV remote.
The output from LDA is sent not only to the Switcher Input #7, but also through a Distribution Amplifier to the monitors in Room 102 and in the Foyer. The Video Messenger, which overlays text onto the video image from LDA, is in line between the Distribution Amplifier and the foyer monitor. So any image that is set in the Video Messenger will be seen on the foyer monitor, displayed over the image from LDA. Remember that regardless of what input is selected on the Switcher for projection in the dome, the output of LDA will still be shown on the monitors in the foyer and in room 102.
Make sure that the SVHS deck is set to "remote" (inspect the switch on the SVHS left front).
- Turn on the VP 20 minutes before.
- Send LN to VP.
- Send SPLS to SW6.
- Send FTIME to SVHS.
- Allow enough time for the SVHS deck to find the specified time.
- Send PLAY to SVHS.
SPLS
Switcher Pulse Switch
SW6
Switcher Channel 6
FTIME#
Find time (hh:mm:ss:ff)
SVHS
Super VHS deck
LN
Lamp On
VP
Video Projector
When needed......
PLAY SVHS
- Send LF to VP (this keeps audio on), or change the Switcher Channel (this cuts off audio).
- If the audio source is the video, and not a synchronized ADAT tape, then fade out the audio with the switcher fader on the mixer.
- Send STOP to SVHS. This command pauses audio and video from the SVHS.
- If the SVHS will not be played again from this location, disengage the heads as follows:
a. Send FASTFWD or REWIND to SVHS.
b. Send STOP to SVHS.
c. Send FTIME for next location to SVHS.
OR, if the SVHS will not be played again during this show, the heads may be disengaged by sending REJECT to SVHS. This will eject the tape.
The relevant portion of a script might look like this (assuming that the audio originates from an ADAT instead of the SVHS tape):
LF Lamp Off VP Video Projector
STOP Stop transport SVHS Super VHS deck
FASTFWD Fast Forward SVHS Super VHS deck
STOP Stop transport SVHS Super VHS deck
FTIME# Find time (hh:mm:ss:ff) SVHS Super VHS deck
The video projector can project the PowerMacintosh's screen (e.g., with Voyager software or PowerPoint presentation software). To view the computer through the video projector, set the switcher to the Macintosh channel with the following command:
SPLS Switcher Pulse Switch SW4 Switcher Channel 4
Handheld radio control of the PowerMac (through TrackMan Live) also affords flexible, modular operation of interactive educational shows.
The Macintosh can be connected to the audio rack to support audio and video editing.
 OBU Planetarium:
http://www.okbu.edu/academics/natsci/planet/index.htm